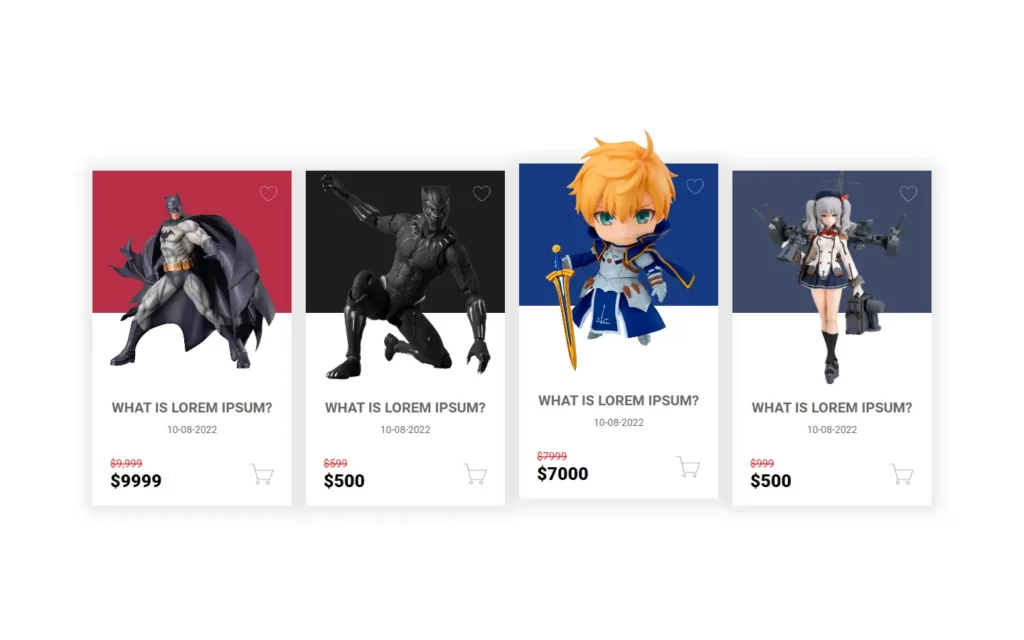
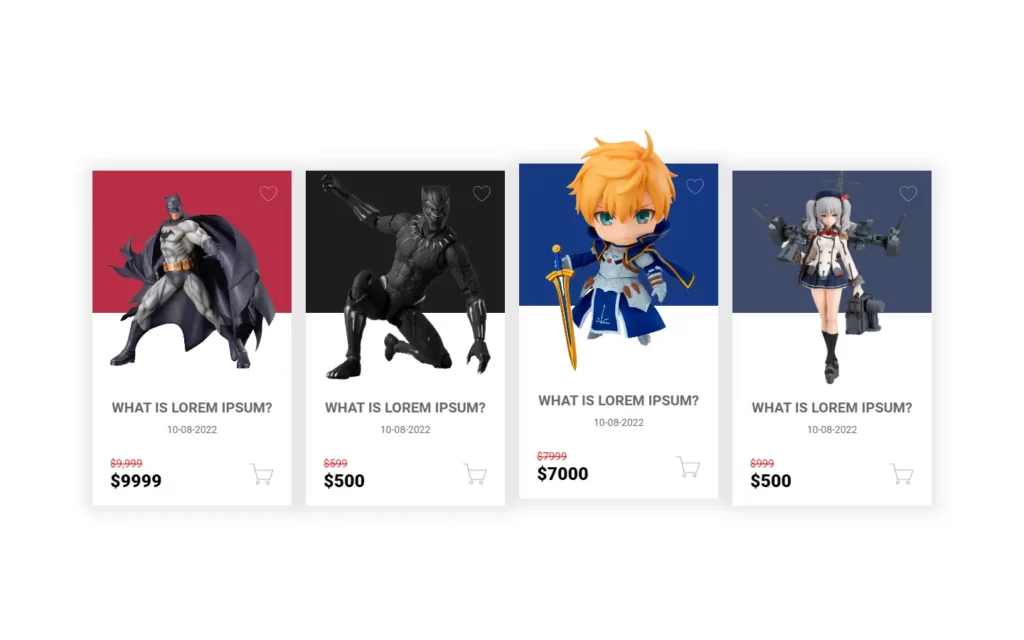
In this article, we will make an E-commerce Product Card Using ReactJS. This will be a beginner-friendly project and quite easy to understand. Also, we will use here most of the React concepts to build this UI. In this project, we will have some cards like any other e-commerce website has, and these cards will have their information on the cards like product_name, details, price, etc. Also, we will give some cool hovering effects to them as well.
Pre-requisites to Make E-commerce Product Card Using ReactJS
- Good knowledge of CSS.
- Basic knowledge of ReactJS and Its Concepts.
- Good knowledge of React props.
Creating Product Cards Skeleton
import React from 'react';
import "./App.css";
import Card from "./components/card";

function App() {
  return (
    <div className="container">
      <div className="row">
        <Card
          title="What is Lorem Ipsum?"
          images="../images/batman.png"
          old_price="9,999"
          newPrice="9999"
          dollar="$"
          alt="batman"
          exp_date="10-08-2022"
        />
        <Card
          title="What is Lorem Ipsum?"
          images="../images/blackpanter.png"
          old_price="599"
          newPrice="500"
          dollar="$"
          alt="blackpanter"
          exp_date="10-08-2022"
        />
        <Card
          title="What is Lorem Ipsum?"
          images="../images/arthur.png"
          old_price="7999"
          newPrice="7000"
          dollar="$"
          alt="arthur"
          exp_date="10-08-2022"
        />
        <Card
          title="What is Lorem Ipsum?"
          images="../images/kashima.png"
          old_price="999"
          newPrice="500"
          dollar="$"
          alt="kashima"
          exp_date="10-08-2022"
        />
      </div>
    </div>
  );
}
export default App;
Foremost, In App.js which by default is linked with index.js, so we don’t need to touch index.js, we can directly go with App.js. Now, in the App component, we need to create a basic skeleton for the cards. For that we have used <Card> tag which is the way of calling the card component, If you’re not familiar with the component, then the component is a file in which you can write your logic. You can check out the tutorial for react component.
We have already imported the Card.js component above, so we can use it with <Card/>. In this, we have added 4 cards and declared some properties like title, image source, old_price, new_price, etc. These properties are known as react props. The working of these props we will add in the Card.js component.
Adding Images to The Card
import React from 'react'

export default function Card(props) {
    let newClassName = `color_bg ${props.alt}`
    let bg_img = `url(${props.images})`
    let { title, old_price, newPrice, dollar, exp_date } = props
    return (

        <div className="card">
            <div className="wrapper">
                <div className={newClassName}></div>
                <div className="card_img" style={{ "backgroundImage": bg_img }}></div>
                <div className="heart">
                    <svg xmlns="<http://www.w3.org/2000/svg>" viewBox="0 0 64 64">
                        <path d="M47 5c-6.5 0-12.9 4.2-15 10-2.1-5.8-8.5-10-15-10A15 15 0 0 0 2 20c0 13 11 26 30 39 19-13 30-26 30-39A15 15 0 0 0 47 5z">
                        </path>
                    </svg>
                </div>
                <div className="cardInfo">
                    <h1>{title}</h1>
                    <p className="date_">{exp_date}</p>
                    <div className="action">
                        <div className="priceGroup">
                            <p className="price old_price">{dollar}{old_price}</p>
                            <p className="price newPrice">{dollar}{newPrice}</p>
                        </div>
                        <div className="cart">
                            <svg className="outCart" xmlns="<http://www.w3.org/2000/svg>" viewBox="0 0 64 64">
                                <path d="M2 6h10l10 40h32l8-24H16"></path>
                                <circle cx="23" cy="54" r="4"></circle>
                                <circle cx="49" cy="54" r="4"></circle>
                            </svg>
                        </div>
                    </div>
                </div>
            </div>
        </div>
    )
}
Now After, we have passed our props then we need to catch it in the Card.js component. In this component, we are getting the name of the card using props.alt as we gave names of the card in the alt prop in App.js. We used color_bg with props.alt so that in CSS we can do some styling with the help of color_bg. Then after we fetched the images from props.image. Then we took let { title, old_price, newPrice, dollar, exp_date } = props this line, so that we don’t need to write props.title, props.dollar etc. every time.
Now in every card we need a heart icon in the image card, for that, we have added an SVG file for the heart. After that, we require every card’s description should have a cart icon as well, so we have added an SVG file for the cart as well here. Then we added card information using props like price, old price, new price, etc.

Adding CSS to Style Card
As you can see, we got our heart icon and cart icon which are too large, but we got them as well as the description. Our card image is hidden behind these icons, so let’s fix it with the help of the below CSS.
Here we used CSS to reduce the icon size and to form the cards. Now we have colored our image’s background for each of the cards. Then we added some animation cards, when we hover over these cards the card will move a little up and the image on that card will be a little bit over to give some 3D type of effect.
With the help of CSS styling, we have added some animation and transitions on the cards to get cool effects.
* {
  margin: 0;
  padding: 0;
}

.container {
  width: 100%;
  height: 100vh;
  padding: 20px 0;
  -webkit-box-sizing: border-box;
          box-sizing: border-box;
  display: -webkit-box;
  display: -ms-flexbox;
  display: flex;
  -webkit-box-pack: center;
      -ms-flex-pack: center;
          justify-content: center;
  -webkit-box-align: center;
      -ms-flex-align: center;
          align-items: center;
}

.row {
  display: -webkit-box;
  display: -ms-flexbox;
  display: flex;
  -ms-flex-pack: distribute;
      justify-content: space-around;
}

.card {
  -webkit-transition: ease all .3s;
  transition: ease all .3s;
  width: 300px;
}

.wrapper {
  margin: 60px 10px 10px;
  padding-top: 300px;
  -webkit-box-sizing: border-box;
          box-sizing: border-box;
  position: relative;
  -webkit-box-shadow: 0 0 20px 10px rgba(25, 25, 25, 0.1);
          box-shadow: 0 0 20px 10px rgba(25, 25, 25, 0.1);
  -webkit-transition: ease all .3s;
  transition: ease all .3s;
}

.wrapper:hover {
  -webkit-transform: translateY(-10px);
          transform: translateY(-10px);
}

.wrapper:hover .card_img {
  height: 350px;
}

.wrapper .heart{
  position: absolute;
  top: 20px;
  right: 20px;
  z-index: 1;
  width: 25px;
  height: 25px;
  color: #fff;
}

.wrapper .heart svg, .wrapper .heart path, .wrapper .heart circle {
  stroke: currentColor;
  fill: transparent;
}

.wrapper .heart {
  cursor: pointer;
}

 .color_bg {
  display: block;
  position: absolute;
  top: 0;
  left: 0;
  width: 100%;
  height: 200px;
}

.color_bg.batman {
  background-color: #b82d44;
}

.color_bg.blackpanter {
  background-color: #1d1d1d;
}

.color_bg.arthur {
  background-color: #153a82;
}

.color_bg.kashima {
  background-color: #3f4a69;
}

.card_img {
  background-size: contain;
  background-position: center bottom;
  background-repeat: no-repeat;
  position: absolute;
  bottom: calc(100% - 300px);
  width: 100%;
  height: 300px;
  -webkit-transition: ease all .3s;
  transition: ease all .3s;
}

.cardInfo {
  display: block;
  padding: 20px 10px 5px 10px;
  -webkit-box-sizing: border-box;
          box-sizing: border-box;
  font-family: 'Roboto';
  color: #666;
}

.cardInfo h1 {
  font-size: 20px;
  text-transform: uppercase;
  text-align: center;
  font-weight: bold;
  line-height: 1.3;
  margin-bottom: 10px;
}

.cardInfo p {
  width: 100%;
  font-size: 14px;
  text-align: center;
}

.action {
  width: 100%;
  display: -webkit-box;
  display: -ms-flexbox;
  display: flex;
  -webkit-box-pack: justify;
      -ms-flex-pack: justify;
          justify-content: space-between;
  -webkit-box-align: center;
      -ms-flex-align: center;
          align-items: center;
  padding: 15px;
  -webkit-box-sizing: border-box;
          box-sizing: border-box;
  margin-top: 15px;
}

.priceGroup {
  display: -webkit-box;
  display: -ms-flexbox;
  display: flex;
  -webkit-box-pack: start;
      -ms-flex-pack: start;
          justify-content: flex-start;
  -webkit-box-align: start;
      -ms-flex-align: start;
          align-items: flex-start;
  -webkit-box-orient: vertical;
  -webkit-box-direction: normal;
      -ms-flex-direction: column;
          flex-direction: column;
}

.priceGroup .price {
  font-size: 18px;
  color: #000;
  text-align: left;
}

.priceGroup .price.old_price {
  color: red;
  font-size: 15px;
  text-decoration: line-through;
  text-align: left;
}

.priceGroup .price.newPrice {
  color: #000;
  font-size: 25px;
  font-weight: 800;
}

.cart {
  display: -webkit-box;
  display: -ms-flexbox;
  display: flex;
  -webkit-box-pack: start;
      -ms-flex-pack: start;
          justify-content: flex-start;
  -webkit-box-align: start;
      -ms-flex-align: start;
          align-items: flex-start;
  -webkit-box-orient: vertical;
  -webkit-box-direction: normal;
      -ms-flex-direction: column;
          flex-direction: column;
  position: relative;
  width: 35px;
  height: 35px;
}

.cart:hover {
  cursor: pointer;
}

.cart svg, .cart path, .cart circle {
  stroke: currentColor;
  fill: transparent;
  -webkit-transition-delay: .2s;
          transition-delay: .2s;
}

Full Source Code of E-commerce Product Card Using ReactJS
index.js
import React from 'react';
import ReactDOM from 'react-dom';
import App from './App';
import * as serviceWorker from './serviceWorker';

ReactDOM.render(
  <React.StrictMode>
    <App />
  </React.StrictMode>,
  document.getElementById('root')
);

// If you want your app to work offline and load faster, you can change
// unregister() to register() below. Note this comes with some pitfalls.
// Learn more about service workers: <https://bit.ly/CRA-PWA>
serviceWorker.unregister();
App.js
import React from 'react';
import "./App.css"
import Card from "./components/card";

function App() {
  return (
    <div className="container">
      <div className="row">
        <Card
          title="What is Lorem Ipsum?"
          images="../images/batman.png"
          old_price="9,999"
          newPrice="9999"
          dollar="$"
          alt="batman"
          exp_date="10-08-2022"
        />
        <Card
          title="What is Lorem Ipsum?"
          images="../images/blackpanter.png"
          old_price="599"
          newPrice="500"
          dollar="$"
          alt="blackpanter"
          exp_date="10-08-2022"
        />
        <Card
          title="What is Lorem Ipsum?"
          images="../images/arthur.png"
          old_price="7999"
          newPrice="7000"
          dollar="$"
          alt="arthur"
          exp_date="10-08-2022"
        />
        <Card
          title="What is Lorem Ipsum?"
          images="../images/kashima.png"
          old_price="999"
          newPrice="500"
          dollar="$"
          alt="kashima"
          exp_date="10-08-2022"
        />
      </div>
    </div>
  );
}
export default App;
App.css
* {
  margin: 0;
  padding: 0;
}

.container {
  width: 100%;
  height: 100vh;
  padding: 20px 0;
  -webkit-box-sizing: border-box;
          box-sizing: border-box;
  display: -webkit-box;
  display: -ms-flexbox;
  display: flex;
  -webkit-box-pack: center;
      -ms-flex-pack: center;
          justify-content: center;
  -webkit-box-align: center;
      -ms-flex-align: center;
          align-items: center;
}

.row {
  display: -webkit-box;
  display: -ms-flexbox;
  display: flex;
  -ms-flex-pack: distribute;
      justify-content: space-around;
}

.card {
  -webkit-transition: ease all .3s;
  transition: ease all .3s;
  width: 300px;
}

.wrapper {
  margin: 60px 10px 10px;
  padding-top: 300px;
  -webkit-box-sizing: border-box;
          box-sizing: border-box;
  position: relative;
  -webkit-box-shadow: 0 0 20px 10px rgba(25, 25, 25, 0.1);
          box-shadow: 0 0 20px 10px rgba(25, 25, 25, 0.1);
  -webkit-transition: ease all .3s;
  transition: ease all .3s;
}

.wrapper:hover {
  -webkit-transform: translateY(-10px);
          transform: translateY(-10px);
}

.wrapper:hover .card_img {
  height: 350px;
}

.wrapper .heart{
  position: absolute;
  top: 20px;
  right: 20px;
  z-index: 1;
  width: 25px;
  height: 25px;
  color: #fff;
}

.wrapper .heart svg, .wrapper .heart path, .wrapper .heart circle {
  stroke: currentColor;
  fill: transparent;
}

.wrapper .heart {
  cursor: pointer;
}

 .color_bg {
  display: block;
  position: absolute;
  top: 0;
  left: 0;
  width: 100%;
  height: 200px;
}

.color_bg.batman {
  background-color: #b82d44;
}

.color_bg.blackpanter {
  background-color: #1d1d1d;
}

.color_bg.arthur {
  background-color: #153a82;
}

.color_bg.kashima {
  background-color: #3f4a69;
}

.card_img {
  background-size: contain;
  background-position: center bottom;
  background-repeat: no-repeat;
  position: absolute;
  bottom: calc(100% - 300px);
  width: 100%;
  height: 300px;
  -webkit-transition: ease all .3s;
  transition: ease all .3s;
}

.cardInfo {
  display: block;
  padding: 20px 10px 5px 10px;
  -webkit-box-sizing: border-box;
          box-sizing: border-box;
  font-family: 'Roboto';
  color: #666;
}

.cardInfo h1 {
  font-size: 20px;
  text-transform: uppercase;
  text-align: center;
  font-weight: bold;
  line-height: 1.3;
  margin-bottom: 10px;
}

.cardInfo p {
  width: 100%;
  font-size: 14px;
  text-align: center;
}

.action {
  width: 100%;
  display: -webkit-box;
  display: -ms-flexbox;
  display: flex;
  -webkit-box-pack: justify;
      -ms-flex-pack: justify;
          justify-content: space-between;
  -webkit-box-align: center;
      -ms-flex-align: center;
          align-items: center;
  padding: 15px;
  -webkit-box-sizing: border-box;
          box-sizing: border-box;
  margin-top: 15px;
}

.priceGroup {
  display: -webkit-box;
  display: -ms-flexbox;
  display: flex;
  -webkit-box-pack: start;
      -ms-flex-pack: start;
          justify-content: flex-start;
  -webkit-box-align: start;
      -ms-flex-align: start;
          align-items: flex-start;
  -webkit-box-orient: vertical;
  -webkit-box-direction: normal;
      -ms-flex-direction: column;
          flex-direction: column;
}

.priceGroup .price {
  font-size: 18px;
  color: #000;
  text-align: left;
}

.priceGroup .price.old_price {
  color: red;
  font-size: 15px;
  text-decoration: line-through;
  text-align: left;
}

.priceGroup .price.newPrice {
  color: #000;
  font-size: 25px;
  font-weight: 800;
}

.cart {
  display: -webkit-box;
  display: -ms-flexbox;
  display: flex;
  -webkit-box-pack: start;
      -ms-flex-pack: start;
          justify-content: flex-start;
  -webkit-box-align: start;
      -ms-flex-align: start;
          align-items: flex-start;
  -webkit-box-orient: vertical;
  -webkit-box-direction: normal;
      -ms-flex-direction: column;
          flex-direction: column;
  position: relative;
  width: 35px;
  height: 35px;
}

.cart:hover {
  cursor: pointer;
}

.cart svg, .cart path, .cart circle {
  stroke: currentColor;
  fill: transparent;
  -webkit-transition-delay: .2s;
          transition-delay: .2s;
}
Card.js
import React from 'react'

export default function Card(props) {
    let CardName = `color_bg ${props.alt}`
    let bg_img = `url(${props.images})`
    let { title, old_price, newPrice, dollar, exp_date } = props
    return (

        <div className="card">
            <div className="wrapper">
                <div className={CardName}></div>
                <div className="card_img" style={{ "backgroundImage": bg_img }}></div>
                <div className="heart">
                    <svg xmlns="<http://www.w3.org/2000/svg>" viewBox="0 0 64 64">
                        <path d="M47 5c-6.5 0-12.9 4.2-15 10-2.1-5.8-8.5-10-15-10A15 15 0 0 0 2 20c0 13 11 26 30 39 19-13 30-26 30-39A15 15 0 0 0 47 5z">
                        </path>
                    </svg>
                </div>
                <div className="cardInfo">
                    <h1>{title}</h1>
                    <p className="date_">{exp_date}</p>
                    <div className="action">
                        <div className="priceGroup">
                            <p className="price old_price">{dollar}{old_price}</p>
                            <p className="price newPrice">{dollar}{newPrice}</p>
                        </div>
                        <div className="cart">
                            <svg className="outCart" xmlns="<http://www.w3.org/2000/svg>" viewBox="0 0 64 64">
                                <path d="M2 6h10l10 40h32l8-24H16"></path>
                                <circle cx="23" cy="54" r="4"></circle>
                                <circle cx="49" cy="54" r="4"></circle>
                            </svg>
                        </div>
                    </div>
                </div>
            </div>
        </div>
    )
}
Output

Check out the video reference here:


[…] How to Make E-commerce Product Card Using ReactJS […]
[…] How to Make E-commerce Product Card Using ReactJS […]
[…] How to Make E-commerce Product Card Using ReactJS […]
[…] How to Make E-commerce Product Card Using ReactJS […]
[…] How to Make E-commerce Product Card Using ReactJS […]
[…] How to Make E-commerce Product Card Using ReactJS […]
[…] How to Make E-commerce Product Card Using ReactJS […]
[…] How to Make E-commerce Product Card Using ReactJS […]
[…] How to Make E-commerce Product Card Using ReactJS […]
[…] How to Make E-commerce Product Card Using ReactJS […]
[…] How to Make E-commerce Product Card Using ReactJS […]
[…] How to Make E-commerce Product Card Using ReactJS […]
[…] How to Make E-commerce Product Card Using ReactJS […]
[…] How to Make E-commerce Product Card Using ReactJS […]
[…] How to Make E-commerce Product Card Using ReactJS […]
[…] How to Make E-commerce Product Card Using ReactJS […]
[…] How to Make E-commerce Product Card Using ReactJS […]
[…] How to Make E-commerce Product Card Using ReactJS […]
[…] How to Make E-commerce Product Card Using ReactJS […]
[…] How to Make E-commerce Product Card Using ReactJS […]
[…] How to Make E-commerce Product Card Using ReactJS […]
[…] How to Make E-commerce Product Card Using ReactJS […]