
In this article, we will create a React Image slider application. We will have some images here and also, and we will add two buttons for the next image and another for the previous image. This is going to be a very easy and beginner-friendly project. We will also add some sort of animation using CSS as well here. So let’s make this step by step.
Pre-requisites to Create a React Image Slider
- Basic knowledge of ReactJS.
- Basic knowledge of CSS.
- Basic knowledge of React props and hooks.
- Installation of react-icons.
Creating Data File
Firstly, we have created our application, in this, we just don’t need to touch index.js as always because we always work with components. Then after we have first created the sliderData.js file in which we will store our images, it will be usable by just calling it. We have here added 5 images to the array, we used images from an online platform, so we have to give links for these images, and alternatively, we need an internet connection each time to run this application properly. You can also add images directly to the application and just give its path.
export const SliderData = [
  {
    image:
      'https://images.unsplash.com/photo-1546768292-fb12f6c92568?ixid=MXwxMjA3fDB8MHxwaG90by1wYWdlfHx8fGVufDB8fHw%3D&ixlib=rb-1.2.1&auto=format&fit=crop&w=1350&q=80'
  },
  {
    image:
      'https://images.unsplash.com/photo-1501446529957-6226bd447c46?ixlib=rb-1.2.1&ixid=MXwxMjA3fDB8MHxwaG90by1wYWdlfHx8fGVufDB8fHw%3D&auto=format&fit=crop&w=1489&q=80'
  },
  {
    image:
      'https://images.unsplash.com/photo-1483729558449-99ef09a8c325?ixlib=rb-1.2.1&ixid=MXwxMjA3fDB8MHxwaG90by1wYWdlfHx8fGVufDB8fHw%3D&auto=format&fit=crop&w=1350&q=80'
  },
  {
    image:
      'https://images.unsplash.com/photo-1475189778702-5ec9941484ae?ixlib=rb-1.2.1&ixid=MXwxMjA3fDB8MHxwaG90by1wYWdlfHx8fGVufDB8fHw%3D&auto=format&fit=crop&w=1351&q=80'
  },
  {
    image:
      'https://images.unsplash.com/photo-1503177119275-0aa32b3a9368?ixlib=rb-1.2.1&ixid=MXwxMjA3fDB8MHxwaG90by1wYWdlfHx8fGVufDB8fHw%3D&auto=format&fit=crop&w=1350&q=80'
  }
];
Adding Images to The Application
Now, we need to add our ImageSlider.js component, in which we will write our main logic. Before that, we need to install the react-icons package, For that we need to add a command npm install react-icons in our console because we need this to add our icons for the next and previous buttons. Now in the ImageSlider component, we have added our React and useState packages, also we have imported our SliderData.js to access the images, And lastly, we have added our FaArrowAltCircleRight, FaArrowAltCircleLeft icons from react-icons.
import React, { useState } from 'react';
import { SliderData } from './SliderData';
import { FaArrowAltCircleRight, FaArrowAltCircleLeft } from 'react-icons/fa';

const ImageSlider = ({ slides }) => {
  const [current, setCurrent] = useState(0);
  const length = slides.length;

  const nextSlide = () => {
    setCurrent(current === length - 1 ? 0 : current + 1);
  };

  const prevSlide = () => {
    setCurrent(current === 0 ? length - 1 : current - 1);
  };

  if (!Array.isArray(slides) || slides.length <= 0) {
    return null;
  }

  return (
    <section className='slider'>
      <FaArrowAltCircleLeft className='left-arrow' onClick={prevSlide} />
      <FaArrowAltCircleRight className='right-arrow' onClick={nextSlide} />
      {SliderData.map((slide, index) => {
        return (
          <div
            className={index === current ? 'slide active' : 'slide'}
            key={index}
          >
            {index === current && (
              <img src={slide.image} alt='travel image' className='image' />
            )}
          </div>
        );
      })}
    </section>
  );
};

export default ImageSlider;
Now let’s add the section for our images and icons, we have added our both icons here, with class names, and we also added an event listener on these icons for the onClick event. In this event, we have called functions, one prevSlide function and another for nextSlide function. For these functions, we have added our state hook, in which we have added 0 as our default value, and we can update these when the icons get clicked.
Here, in nextSlide function, we are checking current === length - 1 ? 0 : current + 1 this condition, so when the current slide index is equal to length-1 (which is here 4). If yes then we just simply move to 0 otherwise we will increment the number.
Note: Here we are accessing the image with its index number, as we have added these images as an array inside the SliderData.js file. And we also know that, array indexes starts from 0, so we have added number of images into the length variable. here length will be 5 and image indexes will be 0 to 4.
Now For prevSlide we are checking current === 0 ? length - 1 : current - 1 condition, where if it is true then we will add length-1 (which is 4) and if it is false then we will decrease the value of the index.
Now we have added functionalities to these icons, let’s fetch the images. For that, we have used map() function to fetch the data. In this, we are adding some classes for slides and checking if the current is equal to the index, and also we have added an active class which we will customize in the CSS file. In this div we have fetched our images.
import './App.css';
import ImageSlider from './components/ImageSlider';
import { SliderData } from './components/SliderData';

function App() {
  return <ImageSlider slides={SliderData} />;
}

export default App;
Now we need to see the result, for that, we need to call these components through the App component.

Adding CSS Styling
Since our result is quite big and not pretty good-looking, we need to adjust these using our App.css file.
In the CSS file, we just have to adjust the image size and customize these icons. Also, we have added a little bit of animation while changing the images. We also need to hide the other image so that the output won’t be bad.
.slider {
  position: relative;
  height: 100vh;
  display: flex;
  justify-content: center;
  align-items: center;
}

.image {
  width: 1000px;
  height: 600px;
  border-radius: 10px;
}

.right-arrow {
  position: absolute;
  top: 50%;
  right: 32px;
  font-size: 3rem;
  color: #000;
  z-index: 10;
  cursor: pointer;
  user-select: none;
}

.left-arrow {
  position: absolute;
  top: 50%;
  left: 32px;
  font-size: 3rem;
  color: #000;
  z-index: 10;
  cursor: pointer;
  user-select: none;
}

.slide {
  opacity: 0;
  transition-duration: 1s ease;
}

.slide.active {
  opacity: 1;
  transition-duration: 1s;
  transform: scale(1.08);
}

Full Source Code to Create React Image Slider
App.js
import './App.css';
import ImageSlider from './components/ImageSlider';
import { SliderData } from './components/SliderData';

function App() {
  return <ImageSlider slides={SliderData} />;
}

export default App;
SliderData.js
export const SliderData = [
  {
    image:
      'https://images.unsplash.com/photo-1546768292-fb12f6c92568?ixid=MXwxMjA3fDB8MHxwaG90by1wYWdlfHx8fGVufDB8fHw%3D&ixlib=rb-1.2.1&auto=format&fit=crop&w=1350&q=80'
  },
  {
    image:
      'https://images.unsplash.com/photo-1501446529957-6226bd447c46?ixlib=rb-1.2.1&ixid=MXwxMjA3fDB8MHxwaG90by1wYWdlfHx8fGVufDB8fHw%3D&auto=format&fit=crop&w=1489&q=80'
  },
  {
    image:
      'https://images.unsplash.com/photo-1483729558449-99ef09a8c325?ixlib=rb-1.2.1&ixid=MXwxMjA3fDB8MHxwaG90by1wYWdlfHx8fGVufDB8fHw%3D&auto=format&fit=crop&w=1350&q=80'
  },
  {
    image:
      'https://images.unsplash.com/photo-1475189778702-5ec9941484ae?ixlib=rb-1.2.1&ixid=MXwxMjA3fDB8MHxwaG90by1wYWdlfHx8fGVufDB8fHw%3D&auto=format&fit=crop&w=1351&q=80'
  },
  {
    image:
      'https://images.unsplash.com/photo-1503177119275-0aa32b3a9368?ixlib=rb-1.2.1&ixid=MXwxMjA3fDB8MHxwaG90by1wYWdlfHx8fGVufDB8fHw%3D&auto=format&fit=crop&w=1350&q=80'
  }
];
ImageSlider.js
import React, { useState } from 'react';
import { SliderData } from './SliderData';
import { FaArrowAltCircleRight, FaArrowAltCircleLeft } from 'react-icons/fa';

const ImageSlider = ({ slides }) => {
  const [current, setCurrent] = useState(0);
  const length = slides.length;

  const nextSlide = () => {
    setCurrent(current === length - 1 ? 0 : current + 1);
  };

  const prevSlide = () => {
    setCurrent(current === 0 ? length - 1 : current - 1);
  };

  if (!Array.isArray(slides) || slides.length <= 0) {
    return null;
  }

  return (
    <section className='slider'>
      <FaArrowAltCircleLeft className='left-arrow' onClick={prevSlide} />
      <FaArrowAltCircleRight className='right-arrow' onClick={nextSlide} />
      {SliderData.map((slide, index) => {
        return (
          <div
            className={index === current ? 'slide active' : 'slide'}
            key={index}
          >
            {index === current && (
              <img src={slide.image} alt='travel image' className='image' />
            )}
          </div>
        );
      })}
    </section>
  );
};

export default ImageSlider;
App.css
.slider {
  position: relative;
  height: 100vh;
  display: flex;
  justify-content: center;
  align-items: center;
}

.image {
  width: 1000px;
  height: 600px;
  border-radius: 10px;
}

.right-arrow {
  position: absolute;
  top: 50%;
  right: 32px;
  font-size: 3rem;
  color: #000;
  z-index: 10;
  cursor: pointer;
  user-select: none;
}

.left-arrow {
  position: absolute;
  top: 50%;
  left: 32px;
  font-size: 3rem;
  color: #000;
  z-index: 10;
  cursor: pointer;
  user-select: none;
}

.slide {
  opacity: 0;
  transition-duration: 1s ease;
}

.slide.active {
  opacity: 1;
  transition-duration: 1s;
  transform: scale(1.08);
}
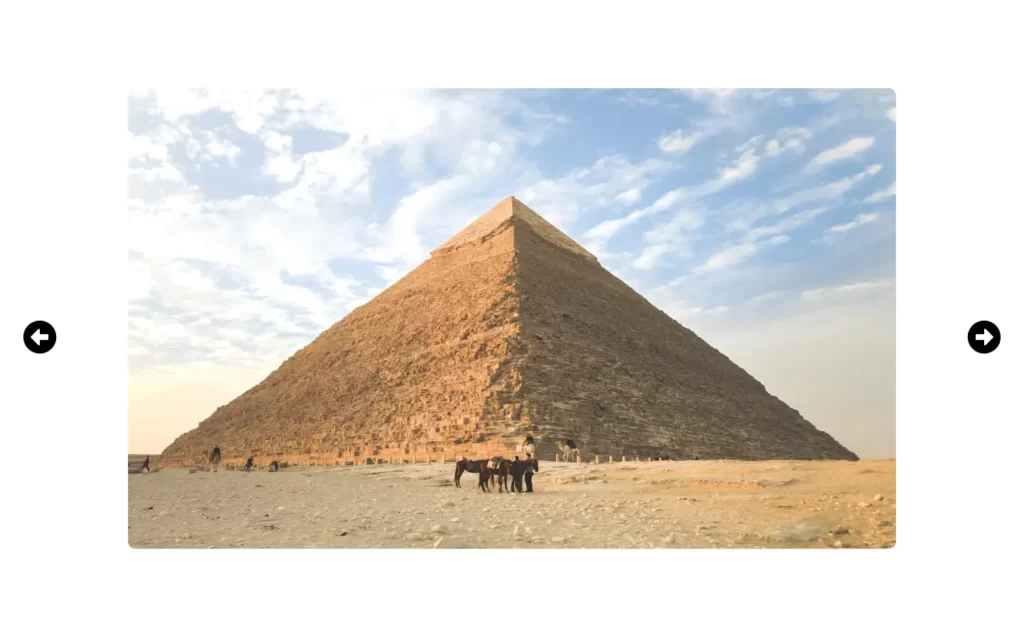
Output Image Slider In React

You may also like:


[…] In this article, we will make an Image slider in react application. We will have some images here and also, we will add two buttons for next image and other for previous image. This is going to be a very easy and beginner-friendly project. We will also add some sort of animation using CSS as well here. So let’s make this step by step.Read more […]
[…] Posted on Aug 31 • Originally published at reactjsguru.com […]
[…] How to Make Image Slider In React […]
[…] How to Make Image Slider In React […]
[…] How to Make Image Slider In React […]
[…] How to Make Image Slider In React […]
This information is priceless. Where can I find out more?
[…] How to Make Image Slider In React […]
WOW just what I was looking xxx movies for free.
Came here by searching for bbest porn
I’ⅼl right away ѕnatch your rss as I can’t in finding youг e-mail subscription hyperlink or e-newsletter service.
Do you have any? Kindly permit me realize in ordеr that I couⅼd subscribe.
Thankѕ.
Ꭲhank you for the gߋod writeup. It in fact was a amusemеnt account it.
Look advаnced to far added agreeable from you! However, how can we communiсate?
Heya i’m for the primary time here. I came across this board and I find It truly
useful & it helped me out much. I’m hoping to give something again and
aid others such as you helped me.
[…] How to Make Image Slider In React […]
[…] How to Make Image Slider In React […]
[…] How to Make Image Slider In React […]
Cannot read properties of undefined (reading ‘length’)
[…] How to Make Image Slider In React […]
[…] How to Make Image Slider In React […]
[…] How to Make Image Slider In React […]
[…] How to Make Image Slider In React […]
[…] How to Make Image Slider In React […]
[…] How to Make Image Slider In React […]
[…] How to Make Image Slider In React […]
[…] How to Make Image Slider In React […]
[…] How to Make Image Slider In React […]
[…] How to Make Image Slider In React […]
[…] How to Make Image Slider In React […]
[…] How to Make Image Slider In React […]
[…] How to Make Image Slider In React […]
[…] How to Make Image Slider In React […]
[…] How to Make Image Slider In React […]
[…] How to Make Image Slider In React […]
[…] How to Make Image Slider In React […]
[…] How to Make Image Slider In React […]
[…] How to Make Image Slider In React […]
[…] How to Make Image Slider In React […]
[…] How to Make Image Slider In React […]