
in this article, we will learn about form validation in react functional components. We have seen react forms in previous articles, validation is the important part of the form. If you’re familiar with HTML forms, then you might have done form validation. React, is pretty much different from HTML forms.
Let’s see step-by-step form validation, also this validation is done with simple react code, so we didn’t use any kind of library here.
What is Form Validation in React?
Validation is the process of checking whether the given data is correct or not. if it is not correct, then inform the user about it and restrict it with an appropriate message. It is quite similar to HTML form validation, but there is some difference as well here.
Creating A Form
import "./App.css";
import React from "react";

function App(){
return (
    <div className="container">
      <form onSubmit={handleSubmit}>
        <h1>Login Form</h1>
        <div className="ui-divider"></div>
        <div className="ui-form">
          <div className="field">
            <label>Username</label>
            <input
            type="text"
            name="username"
            placeholder="Username" />
          </div>

          <div className="field">
            <label>email</label>
            <input
            type="email"
            name="email"
            placeholder="Email"
           />
          </div>

          <div className="field">
            <label>password</label>
            <input
            type="password"
            name="password"
            placeholder="Password"
            />
          </div>
          <button className="fbtn">Submit</button>
        </div>
      </form>
    </div></>
  );
}

export default App;
So foremost, we have created a simple and basic form that has some fields like username, email, password, and lastly a button. We have provided some classes as well to these fields just for some basic CSS styling, nothing else will these classes do.
Also, we have added the handleSubmit function on react form validation on the submit call. We will define it later which consists of the form validation success status.
Adding States to Manage The Fields
import "./App.css"
import React, {useState} from "react";

function App() {
    const intialValues = {username:"", email: "", password:""};
    const [formValues, setFormValues] = useState(intialValues);
		const handleChange = (e) =>{
        const{name , value} = e.target;
        setFormValues({...formValues, [name]: value});
        console.log(formValues);
    }
	return (<>

    <div className="container">

      <form onSubmit={handleSubmit}>
        <h1>Login Form</h1>
        <div className="ui-divider"></div>
        <div className="ui-form">
          <div className="field">
            <label>Username</label>
            <input
            type="text"
            name="username"
            placeholder="Username"
            value={formValues.username}
            onChange={handleChange} />
          </div>

          <div className="field">
            <label>email</label>
            <input
            type="email"
            name="email"
            placeholder="Email"
            value={formValues.email}
            onChange={handleChange} />
          </div>

          <div className="field">
            <label>password</label>
            <input
            type="password"
            name="password"
            placeholder="Password"
            value={formValues.password}
            onChange={handleChange}
            />
          </div>

          <button className="fbtn">Submit</button>
        </div>
      </form>
    </div></>
  );
}

export default App;
Now we have added a state that has initial initialValues which is currently empty for every field. After that, we need to assign the values in our state, if some values enter the field, we have added a function named handleChange in which we are just assigning the values to the state.
Adding Validation to The Form
const [formErrors, setFormErrors] = useState({});
const validate =(values)=>{
        const errors = {};
        const regex = /^[^\\$@]+@[^\\$@]+\\.[^\\$@]{2,}$/i;

        if (!values.username){
            errors.username = "Username is required!";
        }

        if(!values.email){
            errors.email= "Email is required!";
        }else if(!regex.test(values.email)){
            errors.email = "This is not a valid email format!";
        }

        if(!values.password){
            errors.password= "Password is required!";
        } else if(values.password <4){
            errors.password = "Password must be more than 4 characters";
        } else if(values.password>16){
            errors.password = "Password cannot be more than 16 characters";
        }
        return errors;
    }
We have simply added some validation like an empty username, email, and password. Also, we have added another state name error with which we will show the error message of course. Now we have added some constraints, or you can say validations on email and password, For email we have added a regular expression which you can find on the internet easily.
We will match with the input, so basically, a regular expression is the pre-defined pattern. We need to add email according to this pattern, if we don’t follow the pattern then we have to show an error message to a user. We have used the test() method to match this pattern with the given input.
Now, for a password, we have just added two conditions in which the password should have a length between 4 and 16. So this is what we need to validate in our form.
So this is the common and basic validation of the form, which is done without any kind of library. we have simply used some if-else conditions to perform this validation.
Full Source Code of Form Validation in React
import "./App.css";
import React, {useState, useEffect} from "react";
function App() {
const intialValues = {username:"", email: "", password:""};
const [formValues, setFormValues] = useState(intialValues);
const [formErrors, setFormErrors] = useState({});
const [isSubmit, setIsSubmit] = useState(false)
const handleChange = (e) =>{
console.log(e.target);
const{name , value} = e.target;
setFormValues({...formValues, [name]: value});
console.log(formValues);
}
useEffect(() => {
console.log(formErrors);
if(Object.keys(formErrors).length === 0 && isSubmit){
console.log(formErrors);
}
}, [])
const handleSubmit =(e) =>{
e.preventDefault();
setFormErrors(validate(formValues));
setIsSubmit(true);
}
const validate =(values)=>{
const errors = {};
const regex = /^[^\\$@]+@[^\\$@]+\\.[^\\$@]{2,}$/i;
if (!values.username){
errors.username = "Username is required!";
}
if(!values.email){
errors.email= "Email is required!";
}else if(!regex.test(values.email)){
errors.email = "This is not a valid email format!";
}
if(!values.password){
errors.password= "Password is required!";
} else if(values.password <4){
errors.password = "Password must be more than 4 characters";
} else if(values.password>16){
errors.password = "Password cannot be more than 16 characters";
}
return errors;
}
return (<>
<div className="container">
<form onSubmit={handleSubmit}>
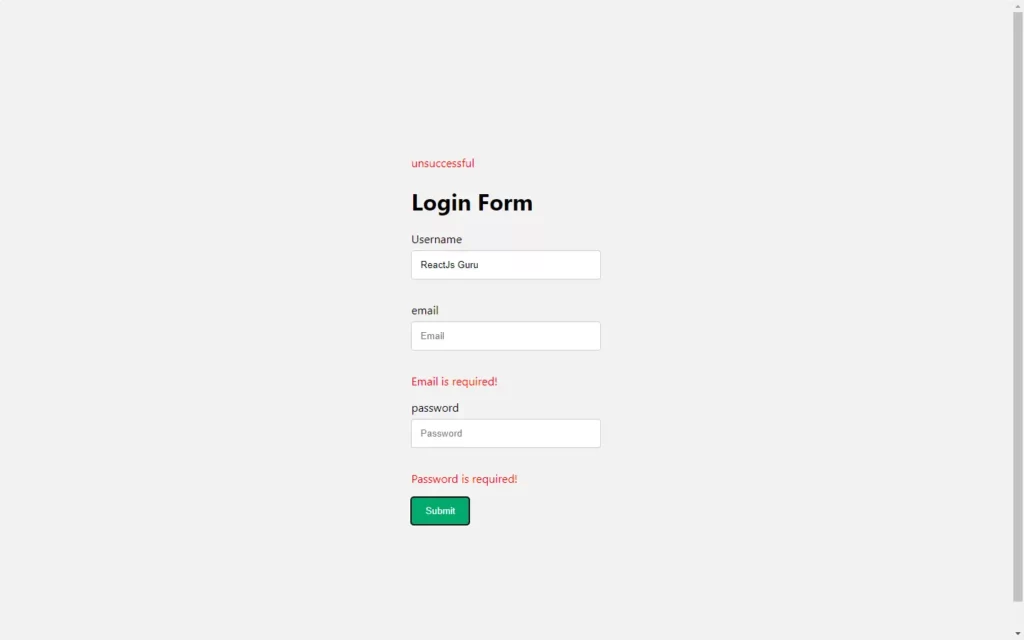
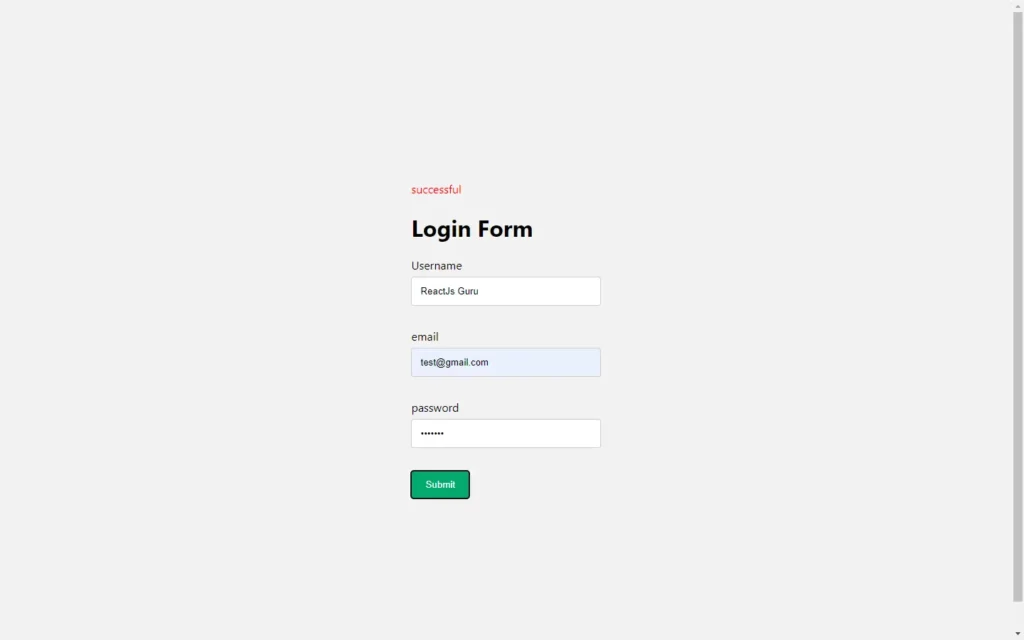
{Object.keys(formErrors).length === 0 && isSubmit ? <p>successful</p>: <p>unsuccessful</p>}
<h1>Login Form</h1>
<div className="ui-divider"></div>
<div className="ui-form">
<div className="field">
<label>Username</label>
<input
type="text"
name="username"
placeholder="Username"
value={formValues.username}
onChange={handleChange} />
</div>
<p>{ formErrors.username}</p>
<div className="field">
<label>email</label>
<input
type="email"
name="email"
placeholder="Email"
value={formValues.email}
onChange={handleChange} />
</div>
<p>{ formErrors.email}</p>
<div className="field">
<label>password</label>
<input
type="password"
name="password"
placeholder="Password"
value={formValues.password}
onChange={handleChange}
/>
</div>
<p>{ formErrors.password}</p>
<button className="fbtn">Submit</button>
</div>
</form>
</div></>
);
}
export default App;
Output


const validate =(values)=>{
if(!values.password){
errors.password= “Password is required!”;
} else if(values.password .length16){
errors.password = “Password cannot be more than 16 characters”;
}
return errors;
}
values.password .length — length is missing